Imagine you are an engineer responsible for monitoring critical application metrics like throughput, latency, or error rate. You need a way to receive notifications when these metrics start trending toward your set limits, allowing you to take preemptive measures to ensure your application runs smoothly. Or perhaps you are a data center manager who wants advance notifications when disk capacity is nearing its limit, enabling you to plan upgrades and prevent downtime. As a business strategist, you might aim to forecast revenue trends to tackle financial planning challenges. In each of these scenarios, having the ability to predict potential issues and receive alerts before they occur can significantly enhance productivity and decision-making.
The Predictive Alerts feature solves these problems by helping you detect issues before they happen. Unlike most alerts that inform you after an event has occurred, Predictive Alerts trigger an alert when your signal is predicted to breach the static threshold you set.
The Predictive Alerts feature uses your historical data to fit a predictive model to your signal. For each incoming data point, the model can predict up to 360 future data points using this historical data. Each data point represents a group of data within one window duration. If any predicted data points breach your static threshold settings, you'll receive an alert, allowing you to take preventative measures before potential issues arise.
Although predictive alerts are useful for many situations, they are not suitable for signals that exhibit "fail fast" or spiky behavior. For example, error counts that are generally steady but experience short-lived spikes cannot be predicted by this feature. In such cases, a static threshold condition is more appropriate and provides the necessary alert coverage.
Supported algorithm
Currently, Predictive Alerts support the Holt-Winters algorithm, also known as exponential smoothing, for both seasonal and non-seasonal time series. The feature uses models based on the algorithm for forecasting and prediction tasks. When fitting a predictive model to your data, it automatically selects either the a seasonal or non-seasonal model based on the behavior of your historical data.
Seasonal model
A seasonal model identifies and utilizes repeating patterns in historical data to predict future values. This repeating pattern is known as seasonality, and the duration required to complete one cycle is called the seasonal length. If your historical data shows evidence of seasonality, the algorithm will automatically detect that seasonal length and apply a seasonal model.
The Predictive Alerts feature support hourly, daily, and weekly seasonal lengths, but not monthly and yearly seasonal lengths. To generate predictions using seasonal patterns it requires historical data that is at least three times the seasonal length: 3 hours for hourly, 3 days for daily, and 3 weeks for weekly. If the available historical data is less than three times the seasonal length, the model will not generate predictions and will wait until enough data is available.
You can't manually select a seasonal length; the model automatically determines it based on the seasonality of your historical data and your signal's window duration. Adjusting the window duration influences the possible seasonal lengths detected by the model. Following are the correlations between different window durations and the resulting seasonal lengths:
Window duration | Possible seasonal lengths |
|---|---|
up to 2 minutes | Hourly |
between 2 minutes and 10 minutes | Hourly or Daily |
Between 10 minutes and 1 hour | Hourly, Daily, or Weekly |
Between 1 hour and 6 hours | Daily or Weekly |
More than 6 hours | Not supported |
Non-seasonal model
If no repeating patterns are detected in the historical data, the algorithm will use a non-seasonal model. This model is based only on the trend and level of the data, allowing it to make predictions without relying on seasonal patterns.
Example: How the feature selects the prediction model based on window duration
If you set a window duration of 1 minute, the possible seasonal length will be Hourly. If the feature detects an hourly seasonal pattern in your historical data, it will apply the seasonal model to the alert condition and use 3 hours of historical data (3 times the seasonal length) to generate predictions.
- If no seasonal pattern is detected, the feature will use the non-seasonal model for prediction.
- If adequate historical data isn't available, the model will wait until enough data is accumulated before generating predictions.
Predictive alerts billing
The Predictive Alerts is an Advanced Compute Product feature offered as an add-on or as a part of the Compute pricing model. Advanced CCUs are consumed for both analysing historical data and generating predictions.
Enable Predictive Alerts
To enable the Predictive Alerts capability, navigate to one.newrelic.com > Administration > Preview & Trials, and enable the Predictive Alerts feature.
Setting up a Predictive Alert
To set up a Predictive Alert, follow the same steps as other alert conditions and then enable the predictive capability during threshold setup. The following procedure shows how to create a Predictive Alert condition by defining your signals through an NRQL query. You can also define your signals by creating a chart or using the guided mode. After defining the signals further steps to create alert condition are same.
Define your signal
To create a new alert condition, from Alert conditions (policies), select New alert condition.
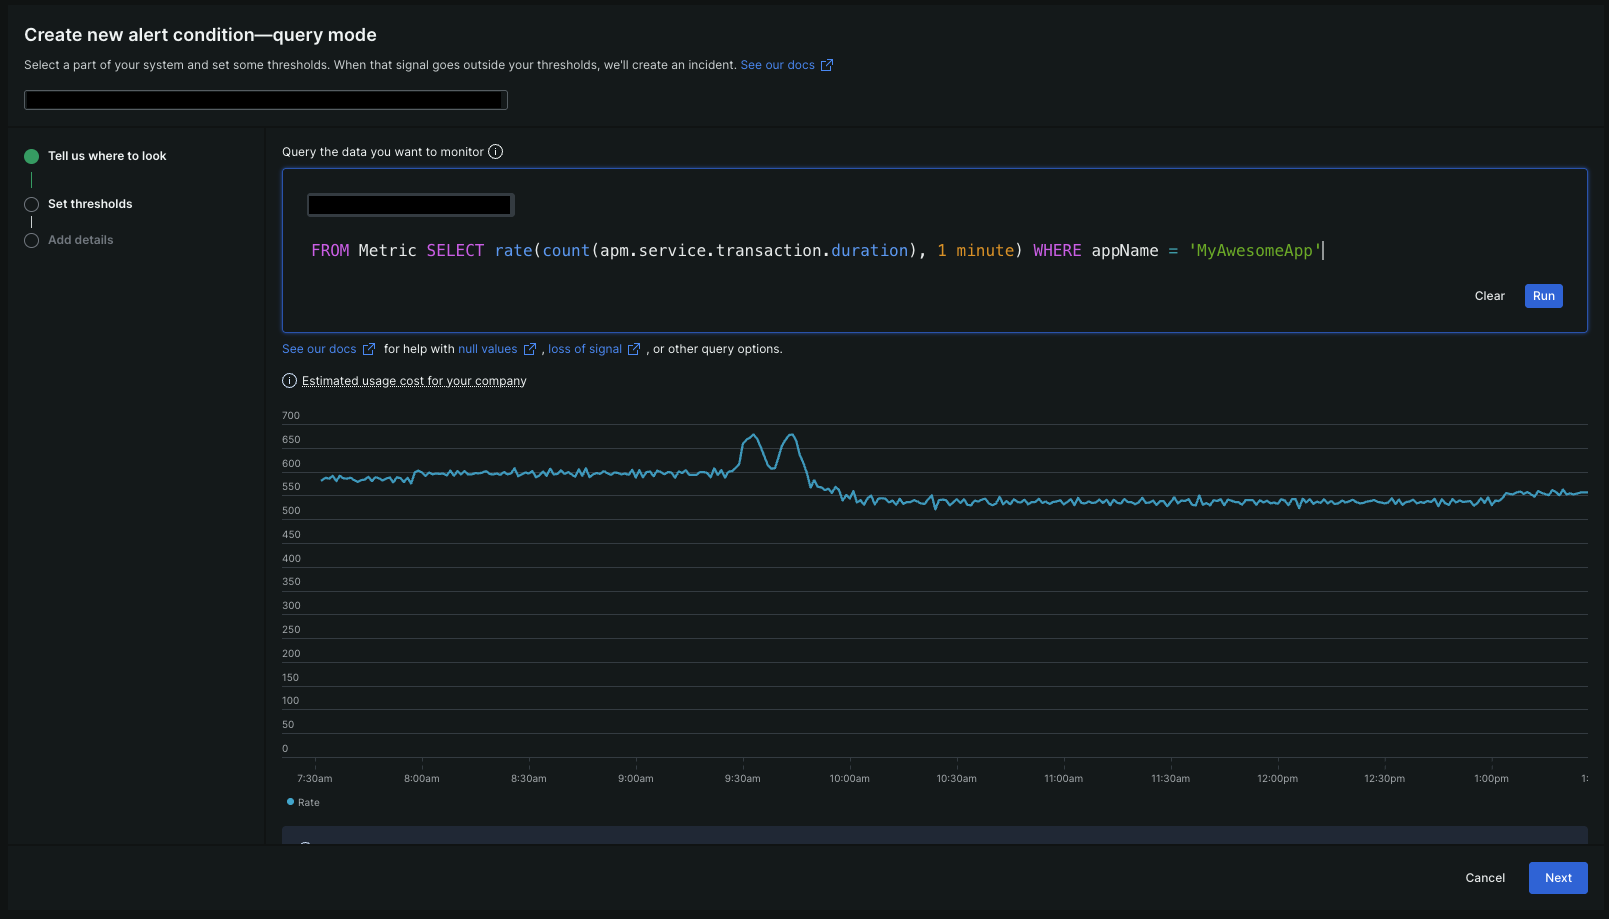
To define your alert signal, select Write your own query and compose your NRQL query. Here is an example query for your reference that will give you the throughput of the
MyAwesomeAppapplication.Sugerencia
To learn more about NRQL and its syntax, refer to the NRQL documentation.
SELECT rate(count(apm.service.transaction.duration), 1 minute)FROM MetricWHERE appName = 'MyAwesomeApp'To preview the chart of your query, click Run.

Fine-tune your signal with advanced settings
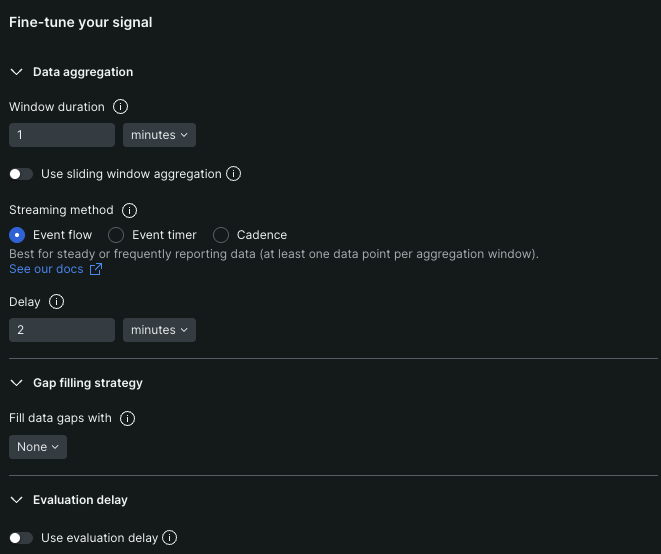
To fine-tune your signal, click Next and do the following advanced configuration as per your requirement:
Advanced setting | Description |
|---|---|
Define how your data is grouped or aggregated for analysis. It's crucial for Predictive Alerts, determining the amount of data used for training and the maximum season length allowed. For more details, refer to the example above. | |
Smooth out fluctuations in signals. Customers on Advanced and Core Compute pricing plans may incur additional CCU charges when utilizing it. For more details, refer to the pricing section for sliding windows. | |
Control how your data is collected prior to being evaluated. Select the option that best matches your data. | |
Set how long to wait for events that belong in each evaluation window. A longer delay time may increase alert accuracy but delay notifications. | |
Define how missing data is handled by our analysis. | |
If you want New Relic to wait for a specific duration before starting to evaluate thresholds against your signal, enable this feature and set the desired waiting time. |

Setting the condition threshold
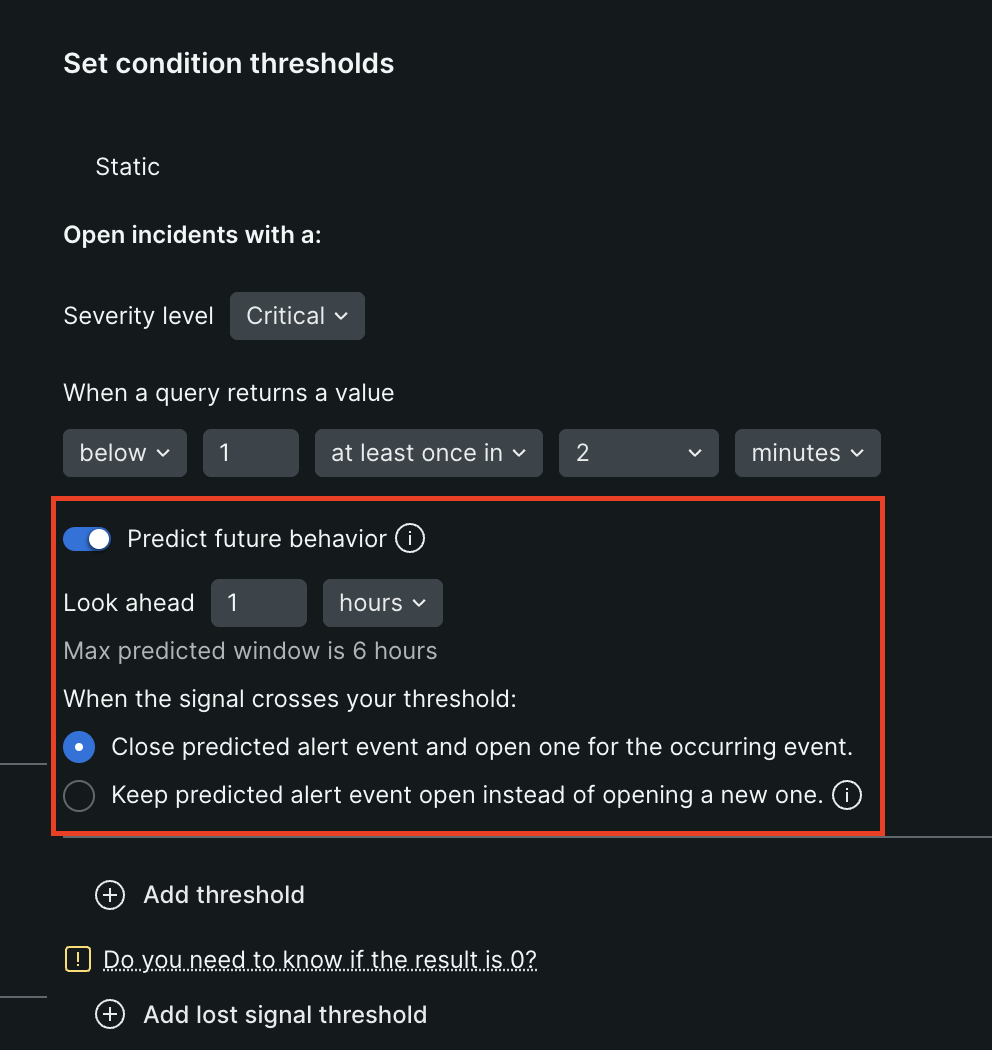
To create a Predictive Alert, you need to set the threshold type to Static. To learn more, refer to the Static threshold documentation.
To implement the predictive capability, enable the Predict future behavior toggle.

Set how far ahead into the future you want to predict by adjusting the look-ahead time.
- Minimum look-ahead time: Two times of the window duration.
- Maximum look-ahead time: 360 times of the window duration.
Set the behavior for the Predictive Alert when the actual signal breaches the threshold. You can choose to close the Predictive Alert and open an actual alert, or keep the Predictive Alert open to reduce noise.
After your condition threshold set-up is complete, click Next.
Add alert condition details
Name your alert condition and attach it to an alert policy. For more details, refer to the Alert condition details.
After completing all of the above steps you will have successfully set up an alert condtion with predictive capability.